

Despite stiff competition in the tech world, the industry is settling on Kubernetes as the default container orchestration engine. Kubernetes has already become one of the top projects on GitHub, despite a mere three years as a public, open-source project.
Microservice architecture is one of the most popular journeys chosen by our enterprise clients and startups. We use the Kubernetes container orchestration tool often as the IT management layer. However, finding a CI tool that will play nicely with Kubernetes is not always easy.
Today we are going to look at Travis-CI as a pipeline for a Kubernetes cluster. While it might not be as powerful as CircleCI or Jenkins, or provide you with a rich UI, it’s one of the simpler tools to set up, supports a lot of different languages, and supports deployment to a variety of different services.
The demo project we are going to look into is built with the help of Microservices, Google Cloud Container Engine, Kubernetes, and Travis-CI.
First, we are going to create a cluster with the help of command line tools and then take a look at Tavice CI scripts to automate that workflow.
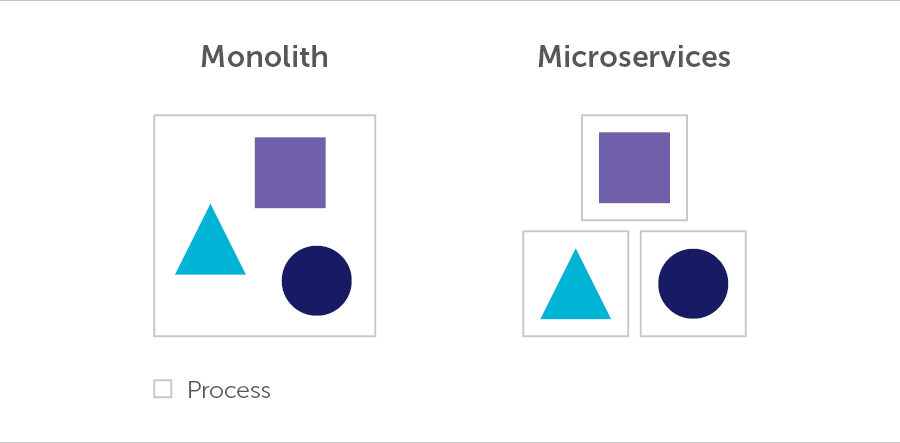
Let’s go through each of these elements to get a better understanding of the problems we are trying to resolve.
Microservices
The next step is to create a service, to provide universal connection naming for interaction between our containers.
Service can also be declared with help of a yaml file.
apiVersion: v1
kind: Service
metadata:
   name: mysql
   labels:
      name: mysql
spec:
 parts:
 - port: 3306
    protocol: TCP
  selector:
     name: mysql
  type: ClusterIP
You get more details about service parameters with the help of kubectl explain command.
kubectl explain service.spec.type
Now let’s create a service with help of kubectl create command
$ kubectl create -f mysql-service.yml
        service "mysql" created
Travis-CI
Travis is a CI tool that allows us to trigger a set of commands after the push to GitHub repo.
Travis does not come with “out-of-the-box” support to Kubernetes. But we can very easily add the tools we need to speak with our Kubernetes Cluster.
Let’s have a look at how we can create the same cluster as above with the help of Travis-CI.
First of all, we need to choose the right Travis-CI version as there are two types of Travis-CI available at different URLs:
- travis-ci.org for open source projects
- travis-ci.com for private projects
The trial version of travis-ci.com has 100 builds included. And this is more than enough for our demo.
In general, we only need two steps to set up Travis-CI for your private repo:
- Step 1: Activate Repository in Travis-CI website. You can use your GitHub account for activation.
- Step 2: Add .travis.yml file to the repository activated above
However, for GCP we need four more steps as Travis-CI should have a secure way to access our cluster in GCP.
- Step 3: Create Service Account with help of GCP Web Console, in the menu API manager -> Credentials. After completing all the necessary steps you will have a client-secret.json file
- Step 4: We need to encrypt this file to increase security and limit number of users who can get access to our cluster. That is why we need to:
- Encrypt it using Travis-CI client tools
$ travis encrypt-file client-secret.json - Push the encrypted file to the repository
- Add credentials decrypting the operation to .travis.yml
- Encrypt it using Travis-CI client tools
Let’s have a look on the resultant config file to Travis-CI.
File: .travis.yml
sudo: required
language: java
jdk:
- oraclejdk8
services:
- docker
env:
    global:
    - PATH=$PATH:$HOME/google-cloud-sdk/bin
    - PROJECT_ID="softserve-demo"
    - ZONE="us-east1-b"
    - IMAGE_NAME=demo:latest
    - FULL_IMAGE_NAME=gcr.io/$PROJECT_ID/$IMAGE_NAME
    - GOOGLE_APPLICATION_CREDENTIALS="${PWD}/client-secret.json"
    - CLUSTER_NAME=softserve-demo
In the before_install section we provide a set of commands that are going to be run by Travis-CI
before_install:
- openssl aes-256-cbk -K $encrypted_142535234c_key -iv $encrypted_12323423423440c_in -in client-secret.json.enc -out client-secret.json -d
Install Google Cloud SDK.
- ./gcloud-sdk-install.sh
- source /home/travis/.bashrc
- ./gcloud-sdk-configure.sh
install: true
In the before_script section we provide scripts to build our application from the source code and pack it into a container. After that we can push it to our private container registry.
before_script:
- ./image-prepare.sh $FULL_IMAGE_NAME
- ./image-push.sh $FULL_IMAGE_NAME
In the script section we select our cluster and use Kubernetes to create deployments and services.
script:
- ./gcloud-select-cluster.sh $CLUSTER_NAME
- ./k8s-run-mysql.sh ''
File: gcloud-ask-install.sh
#!/usr/bin/env bash

set -e

curl https://Sid.cloud.google.com | bash
File: gcloud-sdk-configure.sh
#!/usr/bin/env bash

set -e

gcloud components update kubectl
gcloud auth activate-service-account --key-file "${GOOGLE_APPLICATION_CREDENTIALS}"
gcloud config set project $PROJECT_ID
gcloud config set compute/zone $ZONE
File: image-prepare.sh
#!/usr/bin/env bash

set -e

# Build jar
gradle clean build

#Build image
docker build --no-cache=true -t $1 .
File: image-push.sh
#!/usr/bin/env bash

set -e

gcloud docker -- push $1
File: gcloud-select-cluster.sh
#!/usr/bin/env bash

set -e

gcloud container clusters get-credentials $1
File: k8s-run-mysql.sh
#!/usr/bin/env bash

set -e

kubectl create -f mysql-deployment.yml
kubectl create -f mysql-service.yml
As you see Travis-CI while is very simple provides all we need to create cluster successfully.
Summary
Today, it’s hard to imagine modern tech companies or successful startups without continuous integration (CI) and continuous delivery (CD). As we can see from our demo project, if you need something simple, functional and effective and you don’t have a lot of time, Docker, Google Container Engine (GKE), GitHub, and Travis are your best bet.
We’ve looked at the manual way of creating a 3-node cluster with the help of command line tools gcloud and Kubectl. Then we’ve added Google Compute Engine persistent disks to provide data persistency for our containers, and finally took a look at how Travis-CI can help us to set up our CD pipeline.
Additional information can be found at: