

Nearly every business creates content and needs a management system to organize it. Salesforce has built a content management system (CMS) that allows you to create, manage, and share content across multiple channels — regardless of whether you’re a novice or an expert. It also connects your content delivery to your customer data through other Salesforce projects.
However, if your business has been around for years, you likely have content you’ve already created. The issue then becomes how to move your current content into Salesforce CMS.
Whether you’re currently using a different CMS, planning to migrate your content to Salesforce CMS to phase out a legacy system, or already have customers in Salesforce Community Cloud who will be consuming your content, you need to know how to import custom content types into Salesforce CMS.
Importing Content With Salesforce CMS
To perform a Salesforce CMS Import, you must have a Salesforce org to store it.
You will use the API names of the SObjects to accomplish this. In Salesforce, all records are natively represented as an sObject in Apex, allowing you to access records and their fields directly from Apex. The API names of the SObjects for your content are ManagedVersion (key prefix 20Y) and ManagedContentVersion (key prefix 5OU).
However, you can’t query them directly using SOQL, nor can you use Apex to create the entity — only to access it. To create, edit, and publish CMS records, you can simply use the standard Salesforce UI within their CMS app.
This approach works fine if you’re just starting out with content management.
But if you already have content stored in a third-party system, you’ll likely want to batch import it.
Batch Importing
Salesforce CMS has a built-in import functionality that requires a zip file to upload content. While this may sound straightforward, you will need to prepare this zip file manually.
First, extract all the necessary data from your current CMS storage. Next, process the data using your preferred tools to create a JSON file, which will then be included in the zip file.
To map the JSON file format to Salesforce entities, you’ll need to select the appropriate CMS type for the content:
- Image: A standalone image, such as an infographic, or an image embedded within another CMS item.
- Document: A link to a binary file stored in Salesforce’s CMS.
- News: Can be a blog post or similar format and often contains rich text with embedded images.
Example 1: JSON file with CMS item
{ "content": [ { "type":"cms_image", "urlName":"helpscreenshot", "body":{ "title":"Salesforce Help CMS Screenshot", "altText":"Salesforce Help CMS Screenshot", "source":{ "ref":"images/help.png" } } }] } Here is how we begin importing images into Salesforce CMS.
First, you can upload binary data for images either from a zip package or via a URL. If your image is publicly available — such as being stored on your CDN system — you’ll find the URL option useful.
If you’ve downloaded the binary image files to the local machine, you need to place the entire folder structure under _media folder.
This example places the image file in _media/images/help.png. The URL name for the image is known as the “content slug,” which is a URL-friendly way to link your content. It cannot contain spaces, but may contain dashes, as allowing for titles like “help-screen-shot.” The title field is also used as the record’s name field.
Here are the steps in this example:
- Create the JSON file
- Name it import.json
- Save it in the same folder as _media.
- Go to your CMS Workspace and use the Import Content button to upload the file.
Example 2: JSON response when uploading image
{ "dateTime": "2021-03-26 09:42:07", "jobId": "0gU0H000000000B", "details": [{ "contentKey": "MCTQQSQXQ4CJGRJKBECHTYF34XE4", "managedContentVersionName": "Salesforce Help CMS Screenshot", "managedContentVersionId": "5OU0H000000GmkdWAC", "managedContentId": "20Y0H000000GmeB", "content": "{altText=Salesforce Help CMS Screenshot, source={nodeType=MEDIA, mediaType=IMAGE, isExternal=false, filename=help.png, mimeType=image/png, url=/cms/media/5OU0H000000Gmkd/source?cb=05T0H00000n7o0x, ref=05T0H00000n7o0x}, title=Salesforce Help CMS Screenshot}" }] } Once the import process is completed, you’ll receive an email with a link to the JSON response (see Example 2).
This response contains the contentKey field, which you can use to reference the image in other content items such as news.
Creating custom CMS content types
What if your content items have a different structure? For example, you might want to include several images but avoid displaying them as inline images within the text paragraphs. Or perhaps you have a section with external links that you want to highlight separately from the rest of the text.
In such cases, you’ll need to use custom CMS content types.
You can manually create them using the Metadata API. With this API, you can deploy the custom content types using Visual Studio Code or your favorite deployment tool.
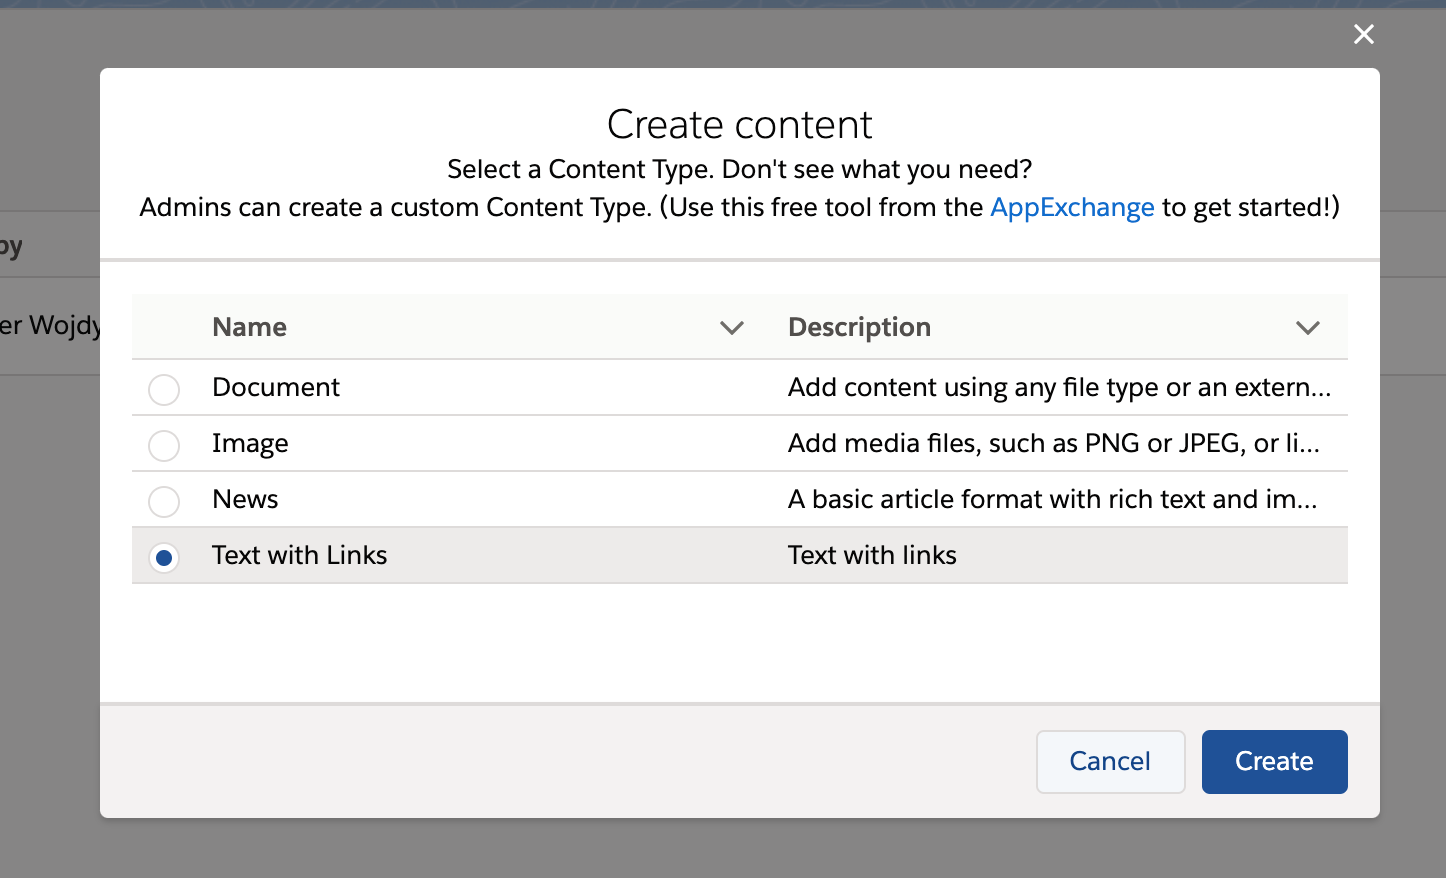
Once you deploy your custom content, you can create new content items by using the Add Content button in your workspace. This functionality is available in the Create Content dialog window, as shown in this image.
As you create a new ManagedContentType, you will use specific nodeTypes to differentiate them. For reference, here are the valid values for nodeType:
- TEXT: Simple text node (255 characters)
- MTEXT: Multi-line, non-formatted text node (2000 characters)
- RTE: Rich text node (65536 characters)
- IMG: Image node
- NAMEFIELD: Name field (80 characters)
Example 3: Managed Content Type XML file
   <?xml version="1.0" encoding="UTF-8"?>

   <ManagedContentType xmlns="http://soap.sforce.com/2006/04/metadata">

        <description>Text with links</description>

        <developerName>textWithLinks</developerName>

        <managedContentNodeTypes>

           <helpText>Title</helpText>

           <isLocalizable>true</isLocalizable>

           <isRequired>true</isRequired>

           <nodeLabel>Title</nodeLabel>

           <nodeName>title</nodeName>

           <nodeType>NAMEFIELD</nodeType>

           <placeholderText>Enter an SEO friendly title...</placeholderText>

    </managedContentNodeTypes>

    <managedContentNodeTypes>

           <helpText>Main image</helpText>

           <isLocalizable>false</isLocalizable>

           <isRequired>false</isRequired>

           <nodeLabel>Primay Image</nodeLabel>

           <nodeName>primaryImage</nodeName>

           <nodeType>IMG</nodeType>

     </managedContentNodeTypes>

     <managedContentNodeTypes>

           <helpText>Main content</helpText>

           <isLocalizable>true</isLocalizable>

           <isRequired>true</isRequired>

           <nodeLabel>Main Content</nodeLabel>

           <nodeName>body</nodeName>

           <nodeType>RTE</nodeType>

     </managedContentNodeTypes>

     <managedContentNodeTypes>

           <helpText>Section with links</helpText>

           <isLocalizable>true</isLocalizable>

           <isRequired>true</isRequired>

           <nodeLabel>Links</nodeLabel>

           <nodeName>links</nodeName>

           <nodeType>RTE</nodeType>

     </managedContentNodeTypes>

     <masterLabel>Text with Links</masterLabel>

  </ManagedContentType>
In this example, you manually create the file to store the content within the managedContentTypes folder. After that, you add the required extensions, so the file name reads as follows: textWithLinks.managedContentType-meta.xml.
The example XML file above has four nodes. The maximum number of nodes for a given node type is 15, so 15 RTE nodes at most.
You can create up to 20 custom content types in your org, but you can request Salesforce to increase this limit if needed.
Now that you know how to create custom content types, how do you upload the content items?
You can use the same import process described earlier, using the JSON example below.
Example 4: JSON contents for custom type.
 {

   "content":[

      {

       "type":"textWithLinks",

       "body":{

          "title":"My Text with Links Item",

          "body":"<p>This is the body of the item. We are using the image already uploaded.</p>",

          "primaryImage": {

             "ref":"MCTQQSQXQ4CJGRJKBECHTYF34XE4"

          },

           "links":"<ul><li><a href=\"https://www.salesforce.com\">Salesforce</a></li><li><a href=\"https://www.softserveinc.com\">SoftServe</a></li></ul>"

          }

    }]

}
Note that the type field in JSON matches the developerName from the XML file.
Within the body structure, you will use the nodeName as field names. The published image that we uploaded earlier can be referenced using its contentKey (see the JSON response from Example 2).
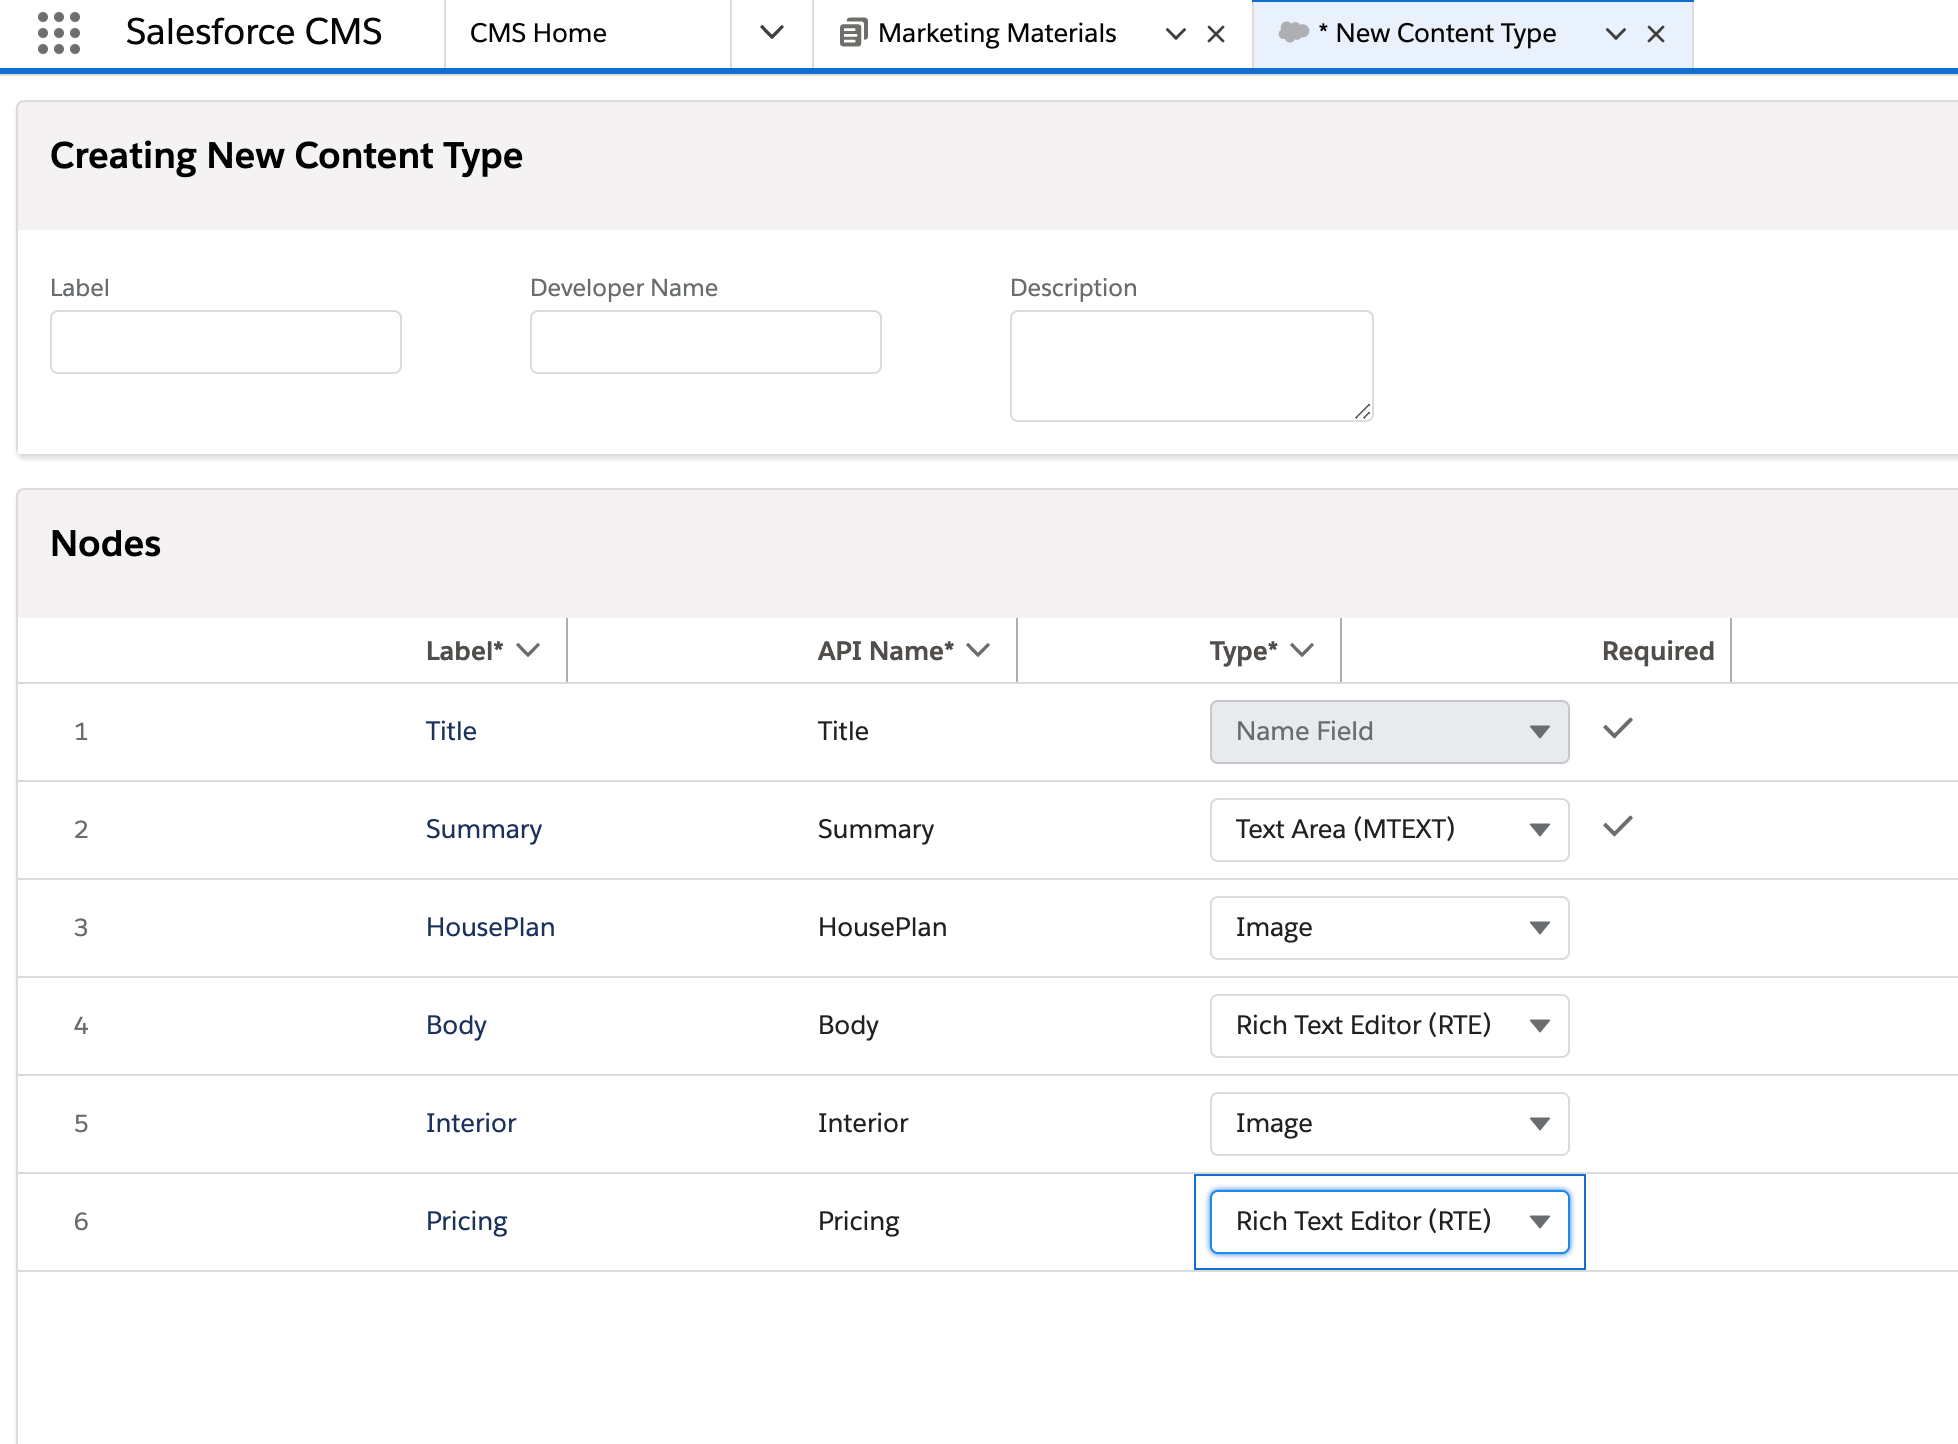
While manually creating XML files is easy, you can simplify the process even further by using the CMS Content Type Creator app from Salesforce Labs.
Once you download the app from the Salesforce AppExchange and install it, you can open it immediately and create new content types.
To do this, use the Add Node button to add nodes. When selecting the node type, the values are the same as in the XML file. Below is an example of an added content type that includes two images.
Creating the Content
You can now create the content using the added content types.
Navigate to the CMS Workspace and click the Add Content button.
Once the form opens, use the same fields and labels you’ve defined earlier.
Once you’ve created the custom content, you will be able to share it in Community Cloud.
Sharing Custom Content Types in Community Cloud
As mentioned earlier, there is always an option to use CMS Connect to share content from other content management systems.
This approach assumes that you’re storing your content outside of Salesforce.
However, we have detailed how to create custom CMS content types because we want to store our CMS content within the Salesforce org. Having it stored locally means we can now share it in the Community Cloud.
As content items are records of theManagedContent object, there are community pages and components that can natively display them.
Let’s first create a collection for all the TextWithLinks published items and then build a new community page.
Open the Experience Builder and navigate to Content Management, then to Collections. Here, you can create a new collection. It’s important to note that you can only select one content type per collection. This will become clear when you add a CMS Collection component to your community home page.
In the properties of the component, there is a section titled Field Mappings.
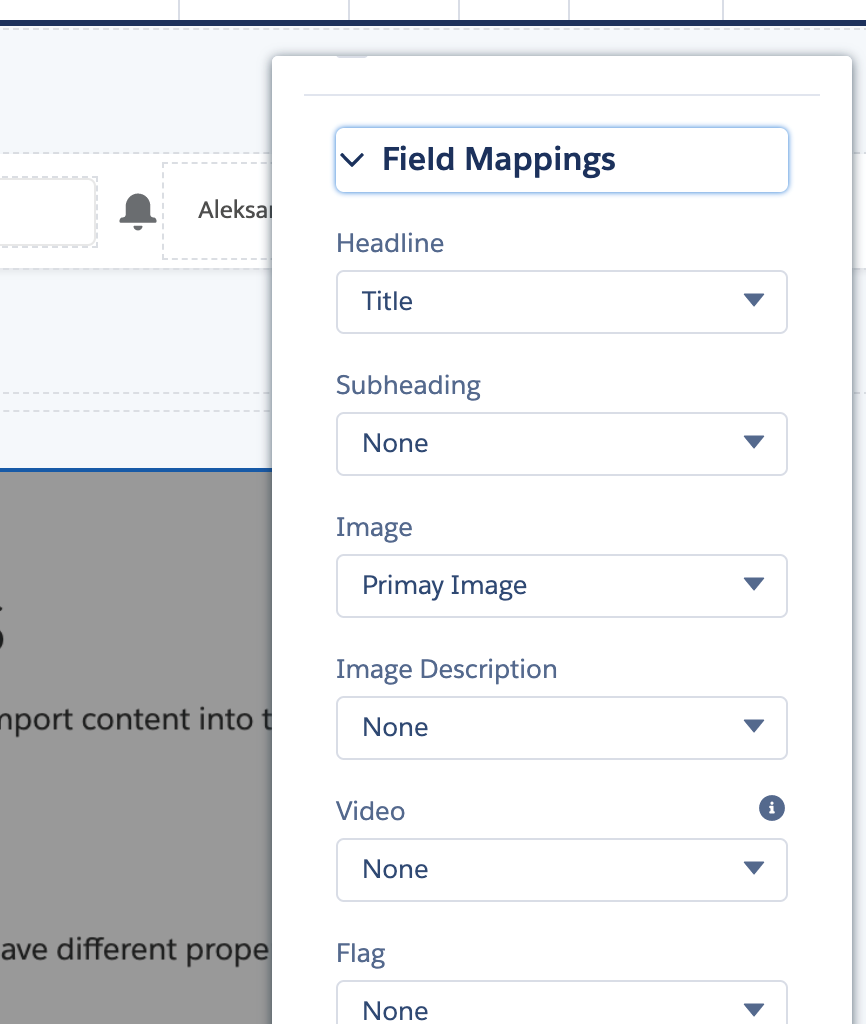
Here, you can select the content item fields to display as a title or image. You can also include multiple images in an item, as shown in the example above.
At this point, your collection of CMS items should be displayed on the homepage.
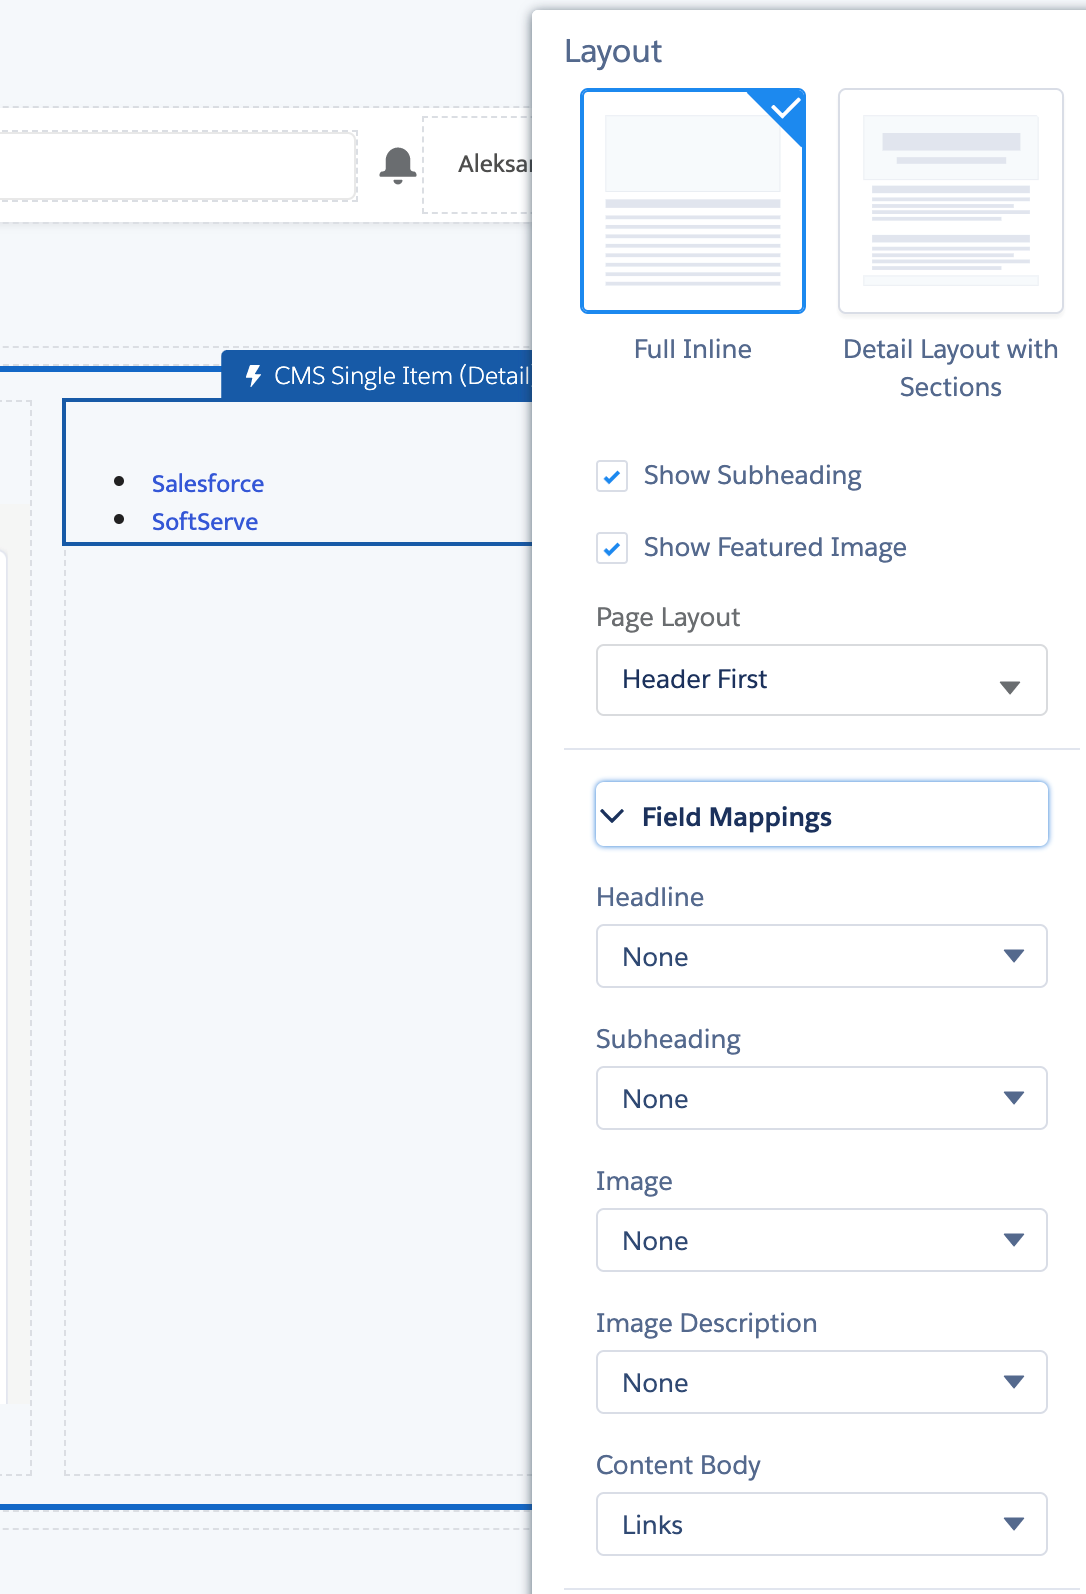
The next step is to create a detail page for the TextWithLinks custom type. The goal is to display the links in a separate column, not below the main text of the blog post.
To do this, open the Pages list and click the New Page button. Select CMS Content Page, then choose your custom content type. By leveraging the full power of a 12-column layout, you can split the main section into two columns.
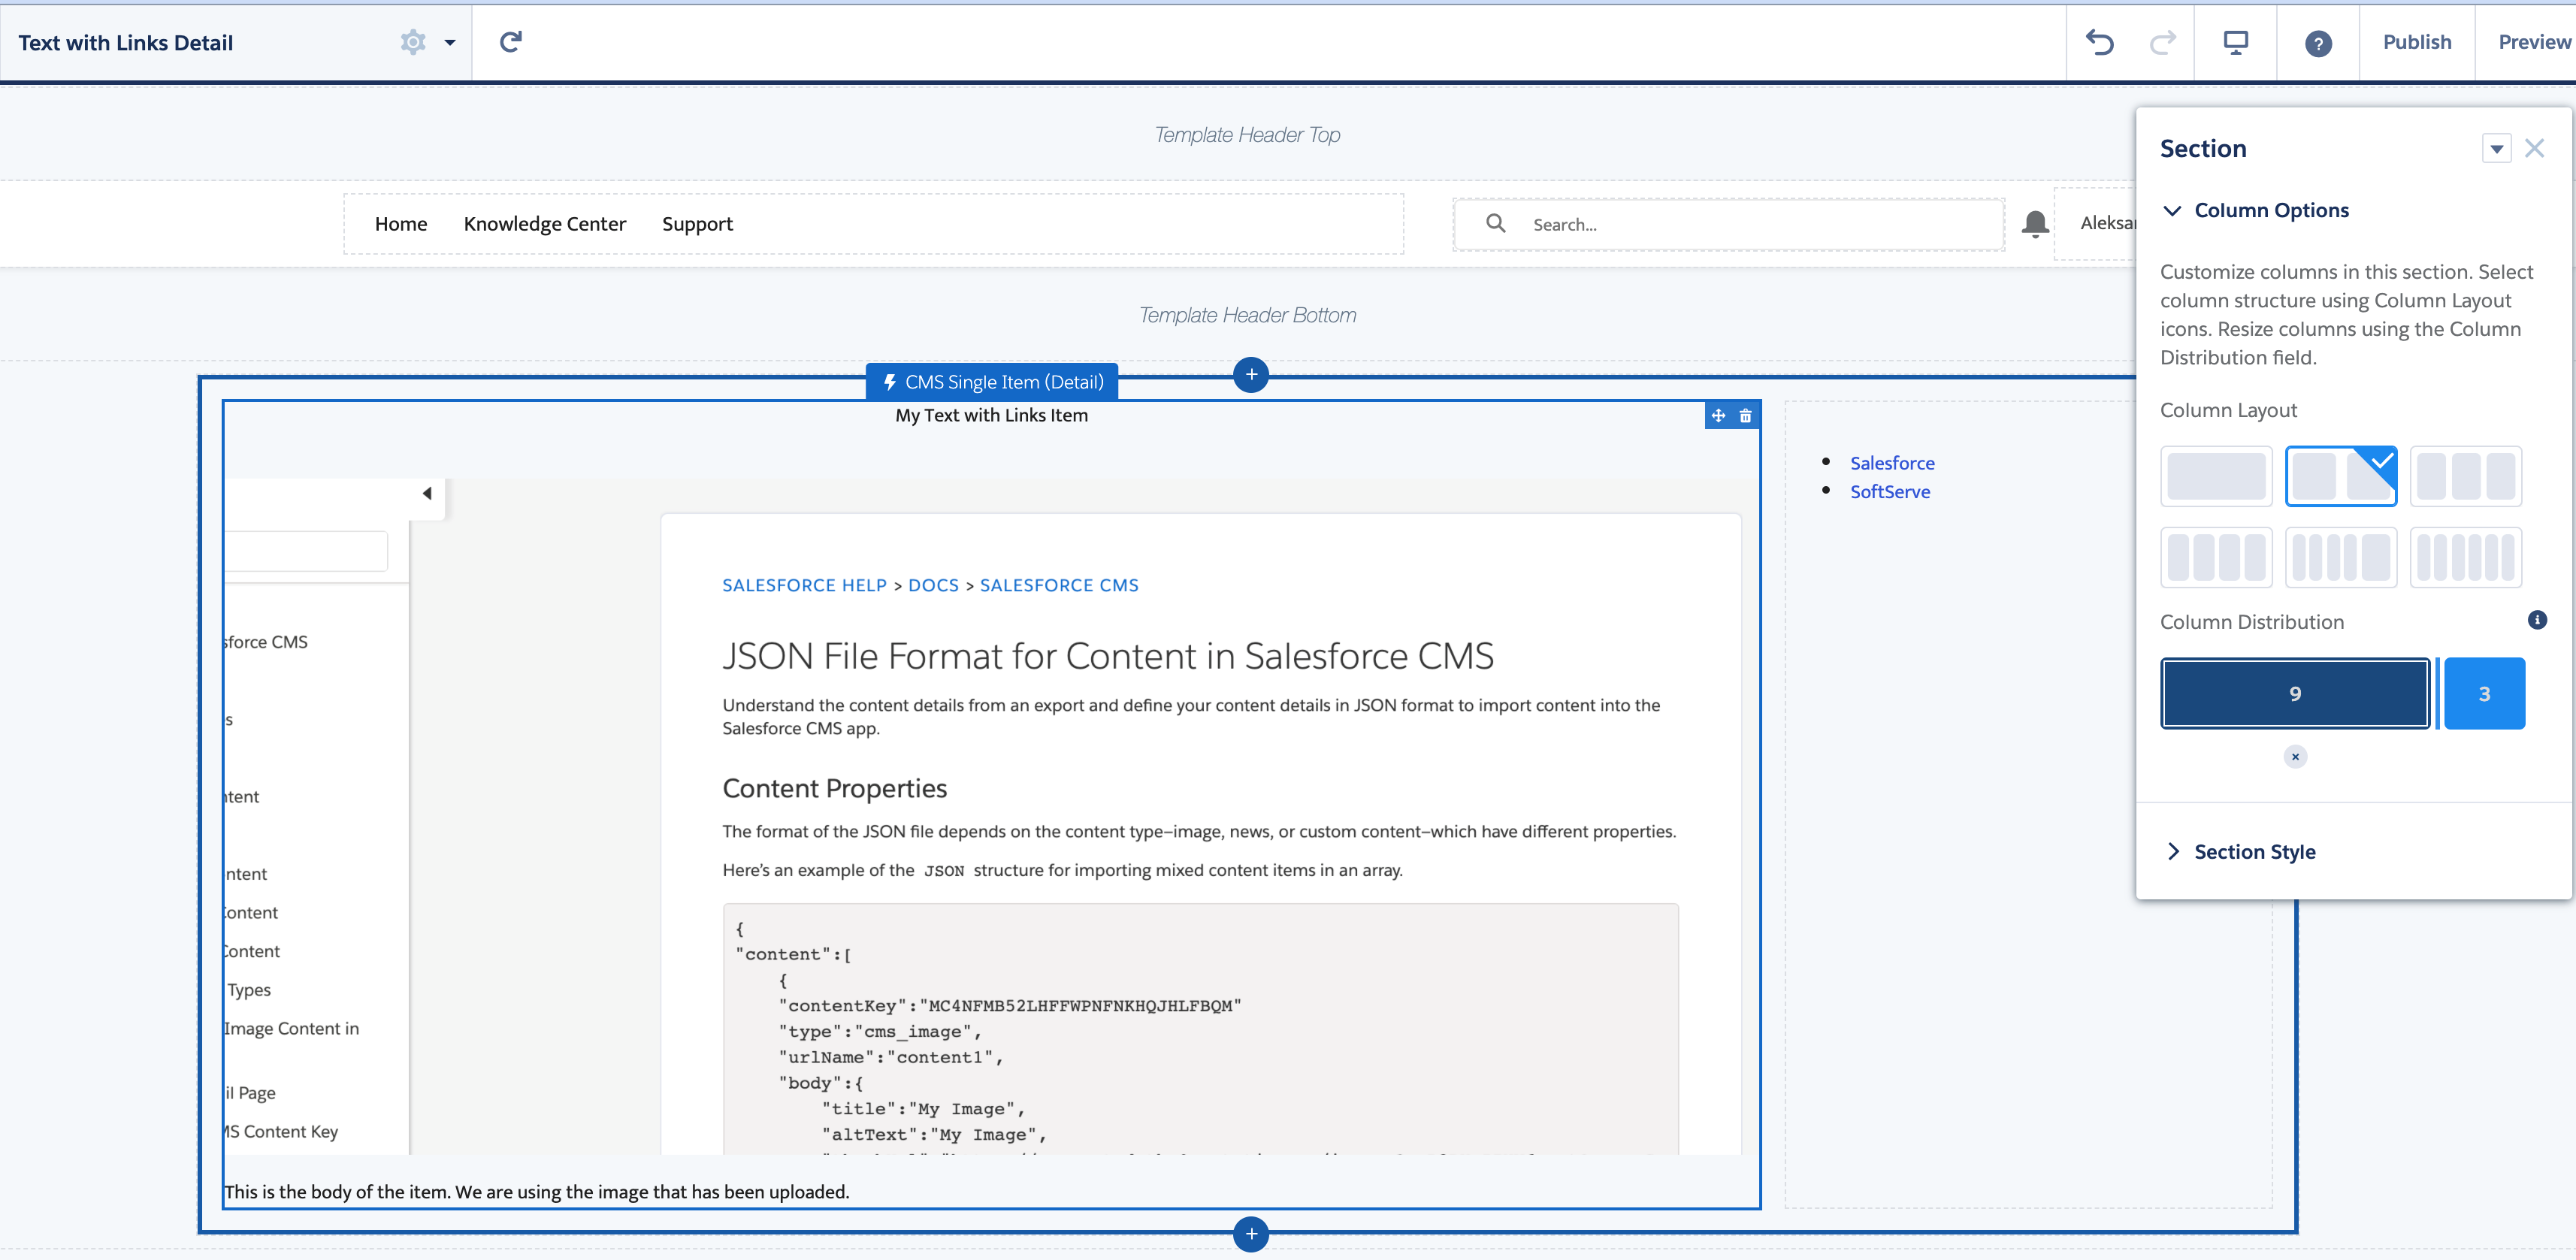
Next, add the CMS Single Item Detail components to both columns.
The wider column on the left will display images and text, while the narrower column on the right will display links.
In the Field Mappings section, select which nodes from the content item you want to display in the community.
Conclusion
This guide has covered the process of importing content items from non-Salesforce CMS storage using JSON files, creating custom content types, and displaying them in the Community Cloud. Salesforce simplifies this process with its no-code and low-code solutions — only the JSON files must be created manually.
The examples provided contain working source code, allowing you to test and deploy them in your developer org. By leveraging these Salesforce features, you expand the reach of your content without minimal additional effort. Sharing your content in the Community Cloud enables you to connect with a broader audience and boost your overall business impact.
Let's talk about transforming your business operations with Salesforce.