

ROS Automation Testing for Wheeled and Legged Mobile Robots
WHY BOTHER WITH ROBOT SOFTWARE AUTOMATION TESTING
Testing in robotics is as important as in other software development domains. The sooner you find an issue, the easier it is to fix. We can divide software testing into two types: manual and automated.
When it comes to manual testing in robotics, there are certain challenges:
- Test execution takes a lot of time.
- Manual tests are hard to scale across environments and require expensive hardware.
Automated testing in a simulated virtual environment allows you to:
- Check robot behavior in a large number of environments and scenarios, to find more bugs than with manual testing.
- Give software developers faster feedback on their applications and see whether they match the correct robot behavior.
There are many ways to classify automation tests. In general, the tests are split into two groups:
Functional tests:
Assess the robot’s ability to complete tasks based on the business logic built into the solution.
Non-functional tests:
Check the robot’s resource use, data storage, streaming capabilities, and more.
Automated tests are split into the following groups:
Smoke tests:
Cover the most crucial robot functions to ensure stable behavior in future tests.
Integration tests:
Test how the solution works when all distributed robot components run together.
Regression tests:
Ensure that recent changes don’t impact the robot’s functional and non-functional characteristics.
Security tests:
Find software vulnerabilities during robot operations under various conditions.
Performance tests:
Focus on non-functional performance, ensuring the robot stays stable and responsive.
Acceptance tests:
Final tests of the robot’s functional behavior before approval and release.
The testing process has three stages:
- Unit tests for individual components
- Hardware integration tests
- Business logic conformity tests
Using automated tests in simulated virtual environments is a great way to cut down on development and maintenance costs. Plus, it helps you save money during hardware testing.
Benefits of AWS RoboMaker
AWS RoboMaker gives you plenty of options to run automated tests, making it one of the most convenient implementation tools. It is a fully managed simulation service that lets you run robot applications in a simulated virtual environment. You can seamlessly integrate your robot automation tests with AWS CodePipeline (or other AWS services) and run them during the CI/CD process.
TYPES OF TESTS
The tests you need depend on the type of robot you're working with. For example, tests for drones won’t work as well for ground mobile platforms, and vice versa. The best approach is to break the tests into sections, with each part responsible for testing specific components, such as the robot’s planner, localization, and more.
Slippage and Motor Saturation Tests
Evaluates motor drivers and algorithms. For instance, they check if the robot moves without commands or whether its movements are precise enough.
Planning Tests
Assess the robot's navigation planner. For example, they verify whether the planner creates a new route when directed to a specific point.
Behavior Tests
Evaluates the robot’s actions under various circumstances, such as obstacle avoidance, coverage testing, and moving from point A to point B.
Localization Tests
Ensures the robot can accurately locate itself on a known map, enabling control over its localization stack.
Let’s show which tests are useful for ground mobile robots. In our examples, we use scenario-based testing, as it allows for easy parameterization of each test and seamless integration of robot simulation tests into the CI/CD process.
HOW TO RUN THE TESTS FOR BOSTON DYNAMICS’ SPOT
SoftServe’s robotics group developed a list of ROS1 tests suitable for any 2D mobile robot. Here’s how to run the tests for the quadruped robot Spot from Boston Dynamics. Controlling multilegged robots is different from controlling robots with wheels or other types of movement. However, the tests mentioned above are fairly generic and focus on high-level control and robot-environment interactions. This makes it easy to adapt to robots, no matter how they move.
Boston Dynamics’ Spot is a highly advanced legged robot that can perform navigation missions, traverse difficult terrains, climb stairs, and carry payloads. You can find out more about the full functionality of Boston Dynamics’ Spot on their official website or read our blog.
The robot is used in pipeline inspection, construction inspection, and healthcare. To ensure Spot is reliable for a specific mission, thorough testing is essential, and AWS RoboMaker serves as an excellent tool for this purpose.
Parts of the code
To test the robot on the AWS RoboMaker, you need:
- A robot simulation package with a control system and navigation stack
- A test package
- A package with scripts to create the cloud formation
- A test launcher that runs test scripts with the required launch files
SoftServe’s robotics group repository Scenario-based tests with AWS RoboMaker for Boston Dynamics' Spot lets you run tests with just one click. The repository has a simulation tool, test packages, cloud formation setup scripts, and test launch scripts. Its modular structure makes it easy to adapt scripts for your application.
The simulation for Spot is based on the open-source package CHAMP, designed for legged robot control. It comes with navigation and localization stacks, making it easy to control the robot’s movements and body positioning. We’ve made the necessary improvements to run CHAMP on AWS RoboMaker.
The cloud formation scripts set up all the AWS resources needed for automated testing.
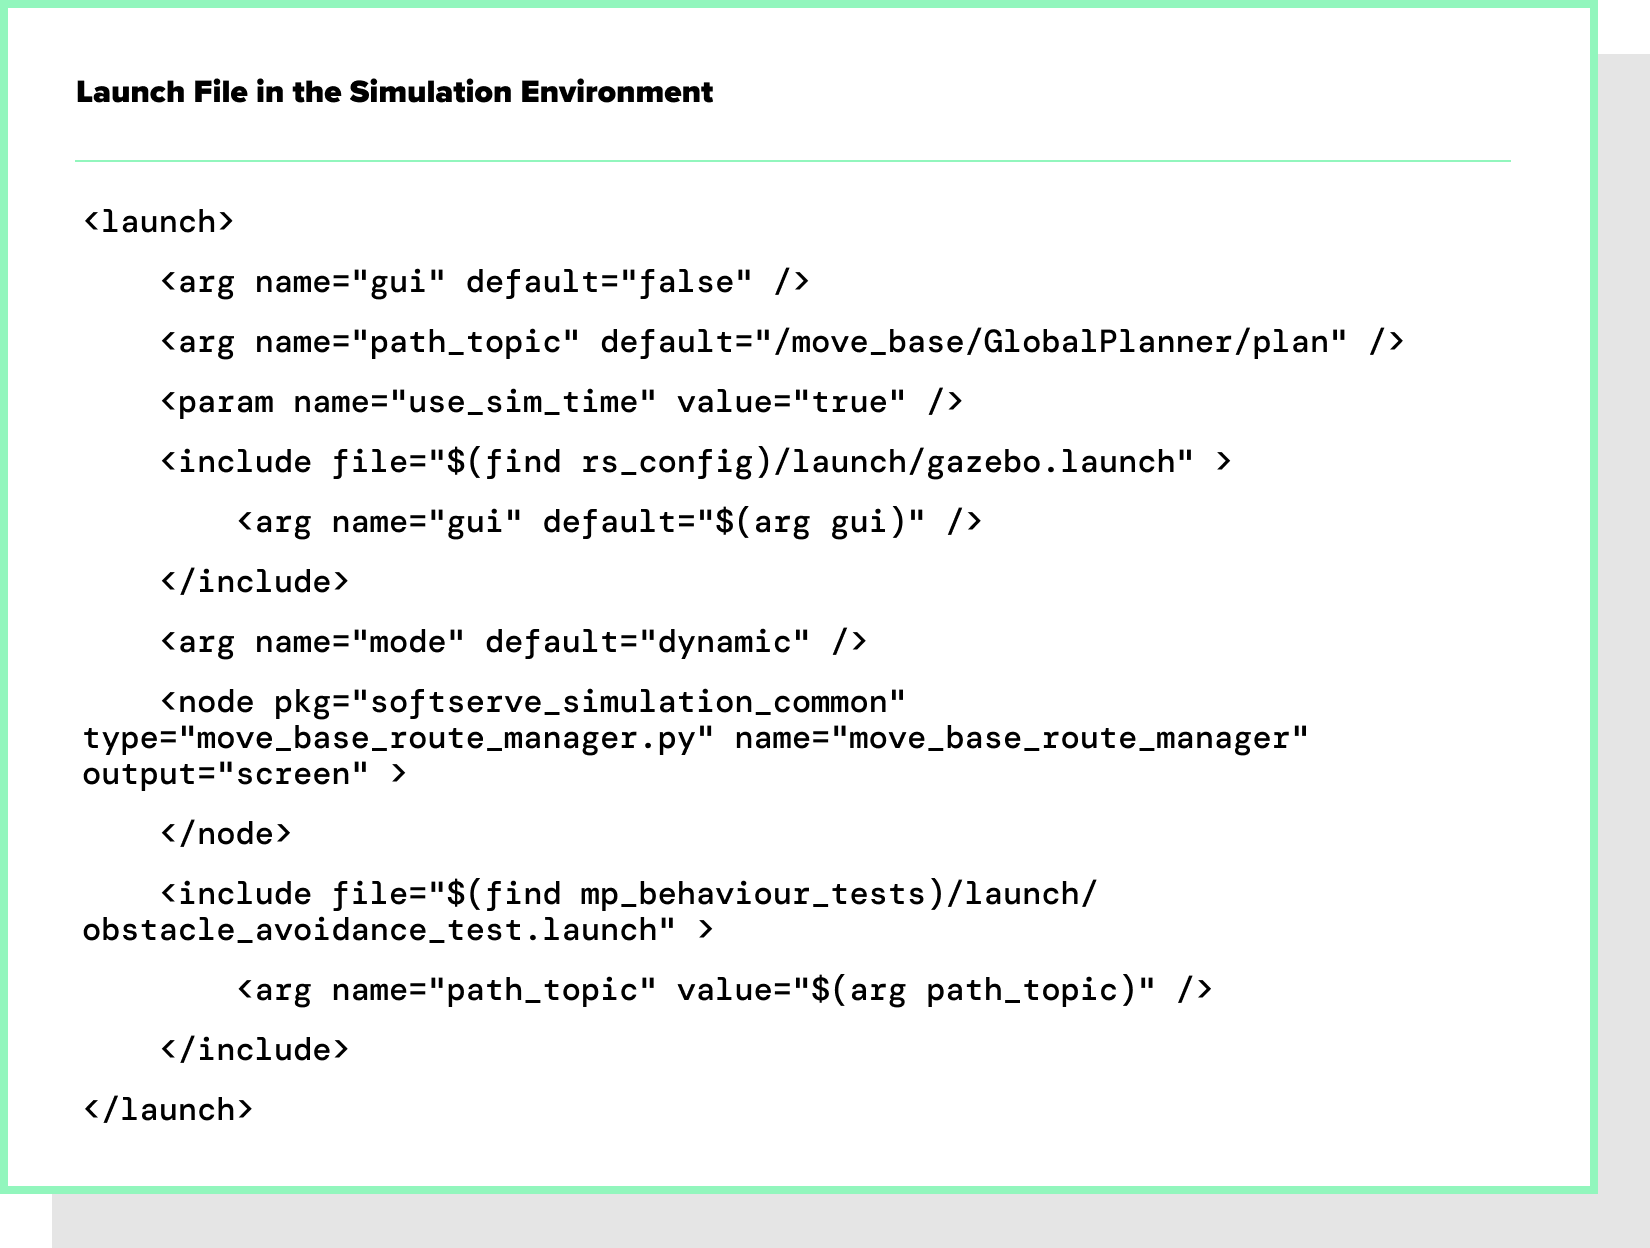
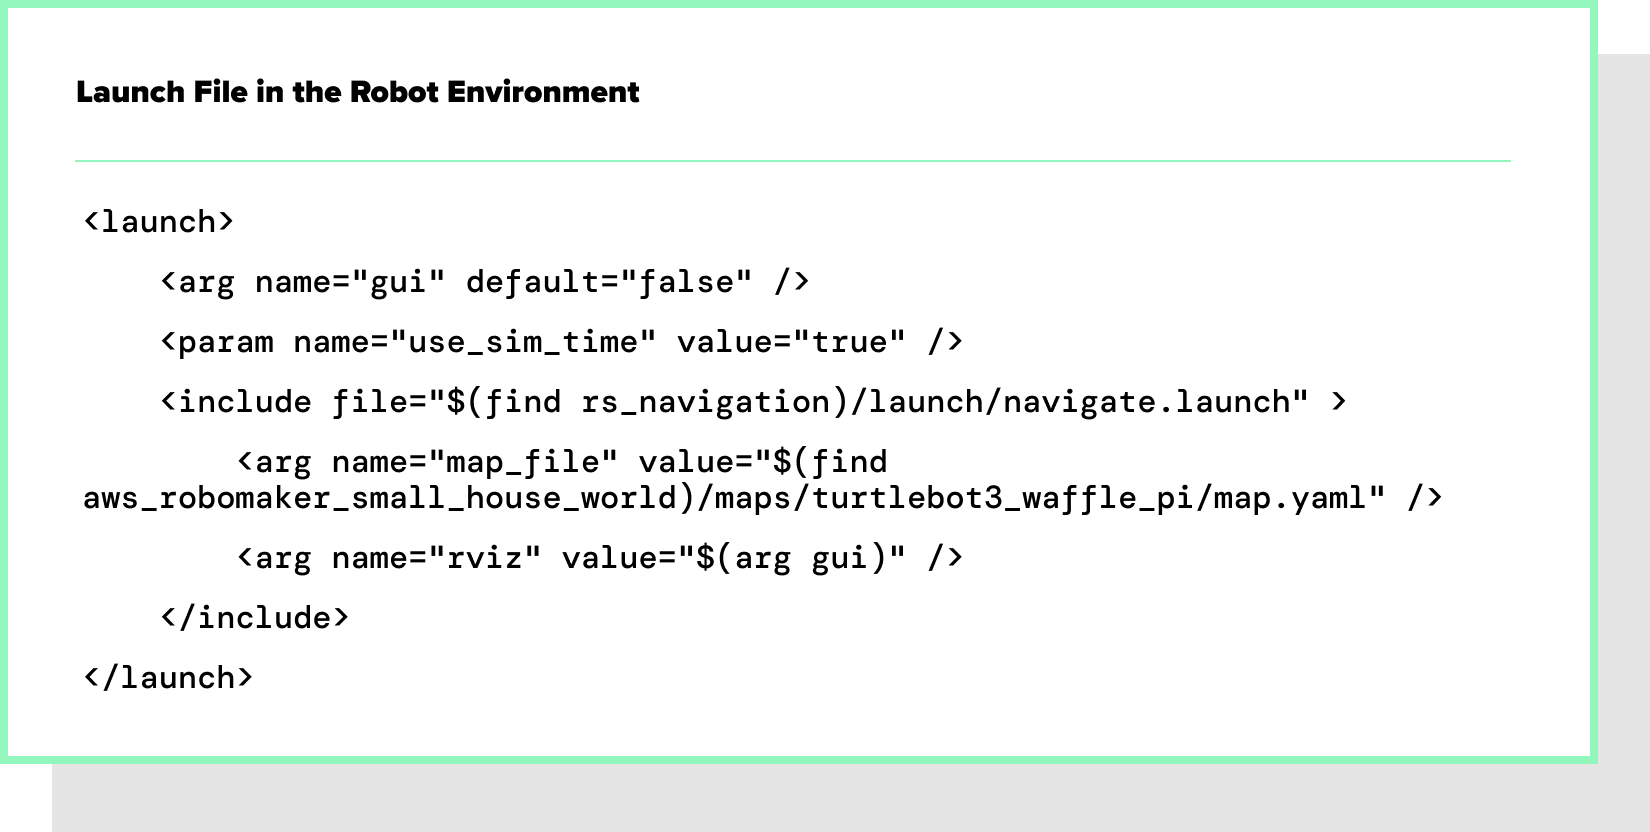
The test launcher starts all the nodes needed to run and launch tests. The simulation tool is split into the simulation environment simulation_ws and robot environment robot_ws. To launch a test, you need to run the required package for testing in both environments. For example, to run an obstacle avoidance test, you need to launch Gazebo with a robot model and test script in the simulation environment, while running the navigation and localization stacks in the robot environment. Examples of such launch files are provided below.
Once the launch files are ready, you can run your test on the AWS RoboMaker platform. But how do you run multiple tests under different environmental conditions at scale? To achieve this, you need to create test scenarios.
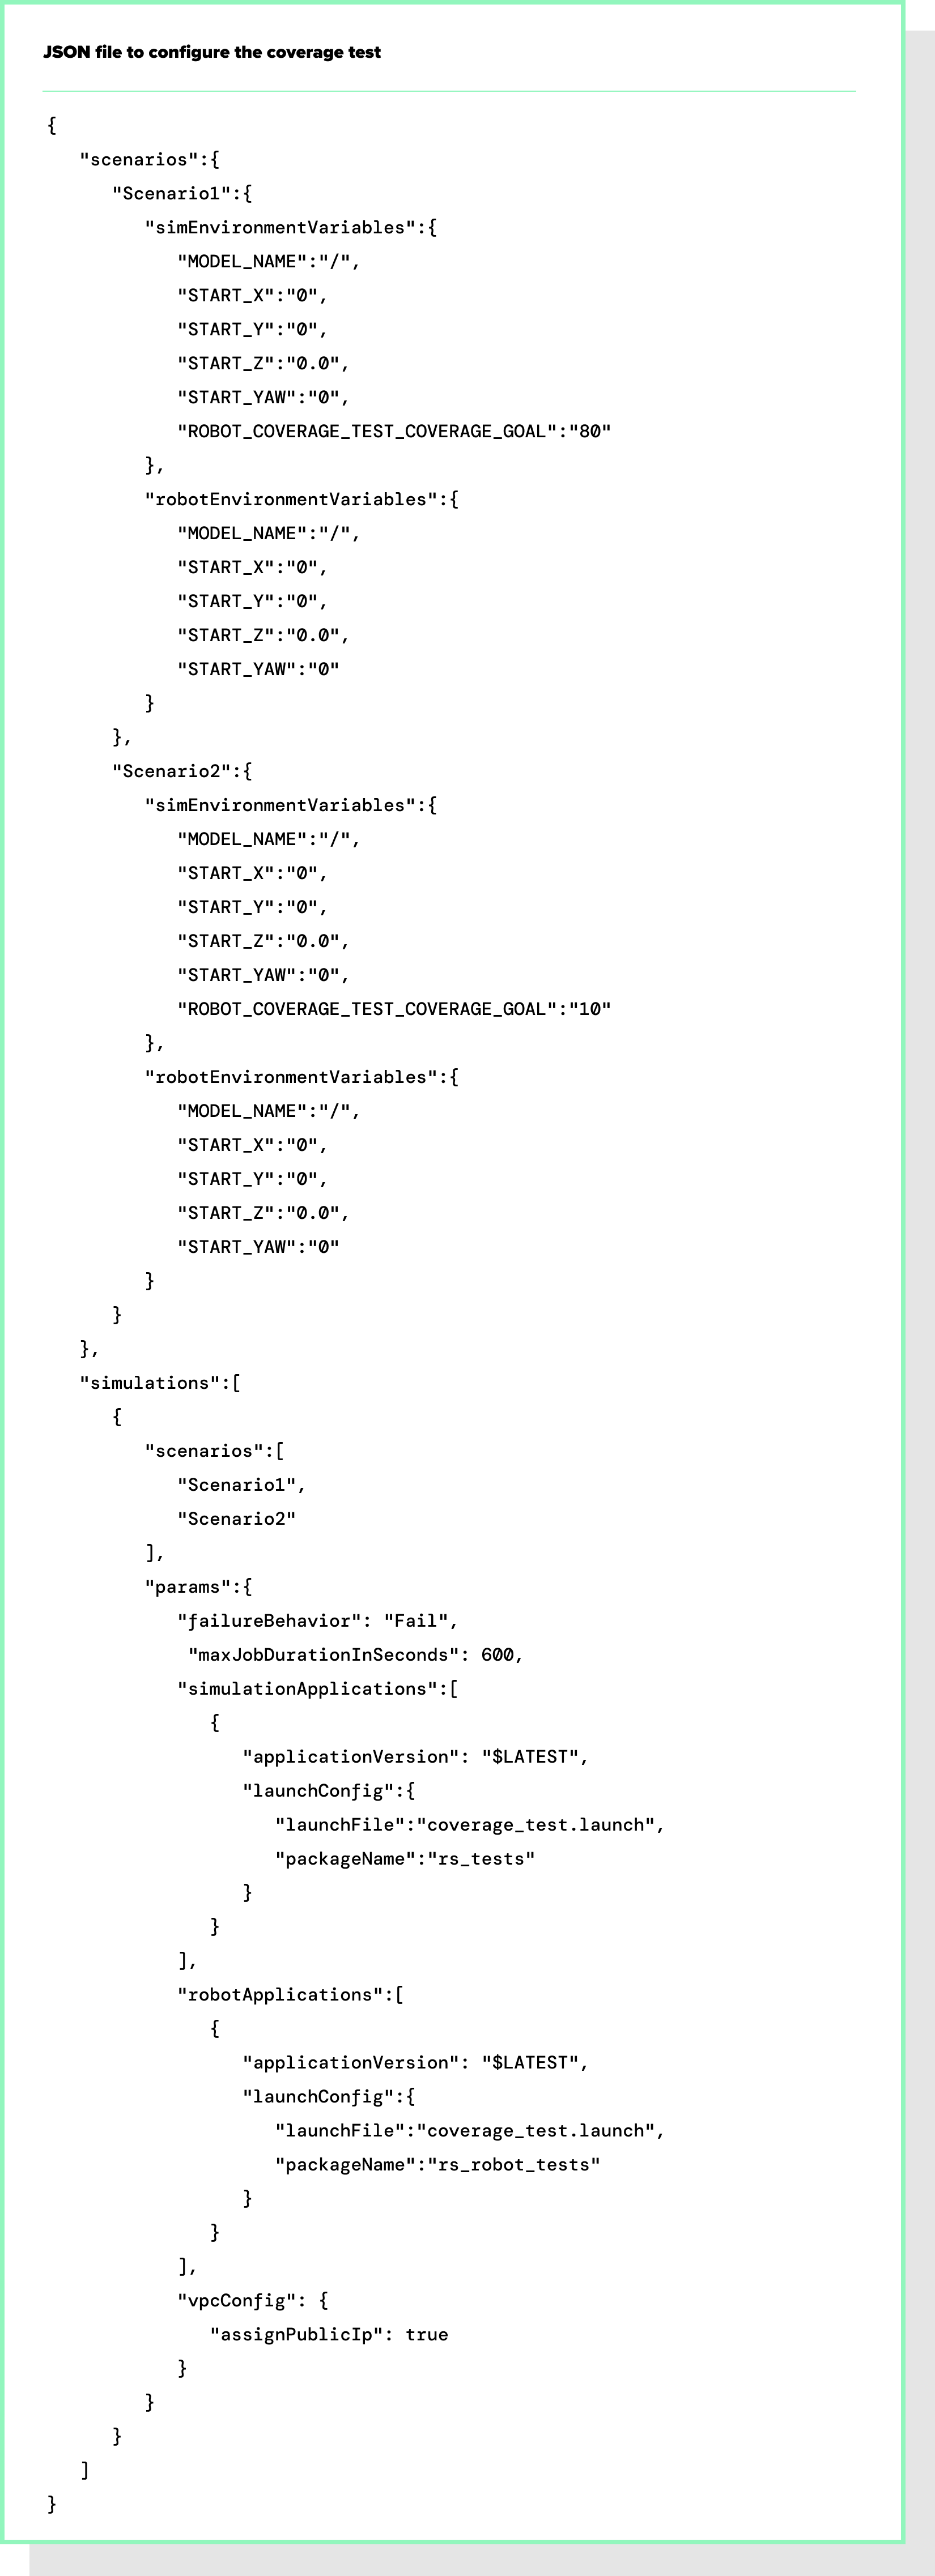
Test scenarios
A scenario is a set of parameters that define environment conditions, robot behaviors, and expected outcomes. AWS RoboMaker lets you run hundreds of simulation tests with different scenarios at scale. Take a look at the JSON file to configure the coverage test given below.
The coverage test checks how well the robot can clean the floor in its environment. In this case, the test-related parameter is ROBOT_COVERAGE_TEST_ COVERAGE_GOAL which determines the coverage goal. You can set different goal values for different scenarios.
Run Test
To run a test, you should execute the following command in an IDE terminal:
cd /environment/aws _ ros _ tests./run.sh test _ launch _ json/.json
For example, run the coverage test:
cd /environment/aws _ ros _ tests./run.sh test _ launch _ json/coverage _ test.json
This command launches two simulations using parameters from the coverage_test.json file for two scenarios. Once complete, you can view the test results tied to the simulation jobs. For instance, the coverage test is tagged with details such as why the test ended, the results, current coverage value, start and end simulation times, and the corresponding test scenario.

Tags can include more information, helping you quickly find the root cause of bugs. Assigning tags is easy with a simple command:
self.utils.set_tag(name=self.test_ name + "_Status", value="Failed")
Examples of other automation tests’ execution
Let’s look at a few tests from our test repository.
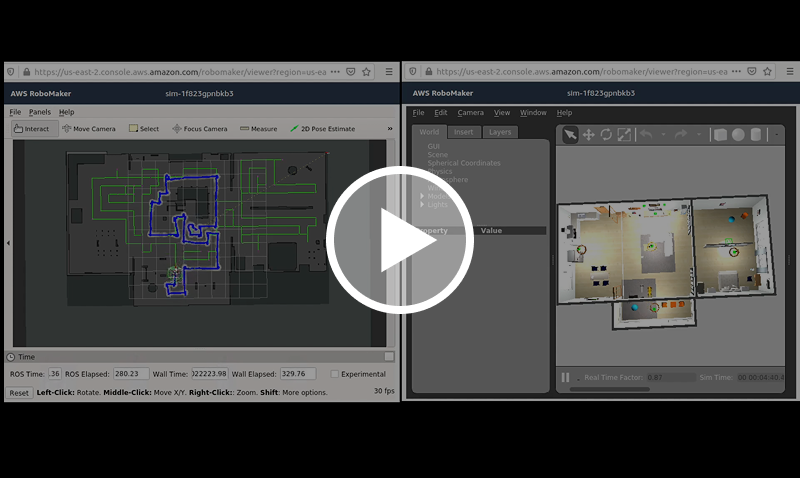
Discover Advanced Automation with ROS 2Slippage and motor saturation tests: standstill test
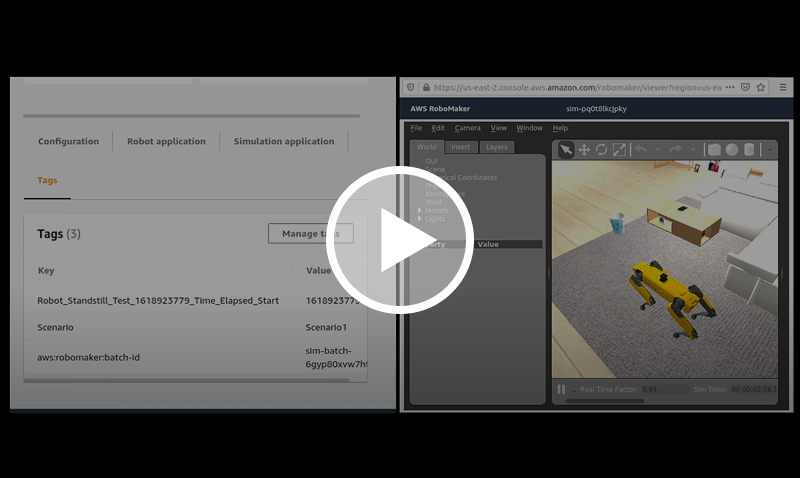
Video 1 shows a standstill test to check if the slippage is set to a realistic value. On a flat surface, the robot's 6DOF position should stay the same over time.
The test is marked as Failed if the robot's 6DOF position changes during a set time. Conversely, it is marked as Passed if the robot's 6DOF position stays the same within a shorter time frame than the predefined period.
Video 1 also shows that when the robot’s position changed, the test was tagged as failed. You can run various scenarios where the robot is spawned on different floor materials (e.g., wood, concrete, etc.) and adjust its position and orientation tolerance.
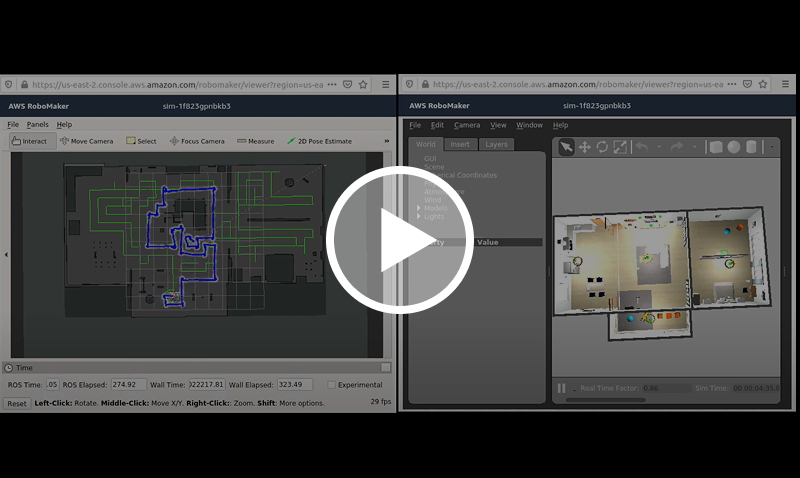
Planning test: navigation from point A to B with predefined position and orientation tolerances
After testing how the robot interacts with different environments, the next step is to evaluate a planning algorithm. In Video 2, the robot moves through an apartment to a random goal.
This test checks if the robot can get from Point A to Point B with predefined accuracy, while also considering the goal's yaw orientation.
The test is marked as Failed if a timeout occurs and the robot does not reach the goal within the predefined tolerances. It’s marked as Passed if the robot reaches Point B accurately and within the allotted time (less than the timeout).
You can run many tests at scale to see how the robot gets to random points or predefined locations on the map.
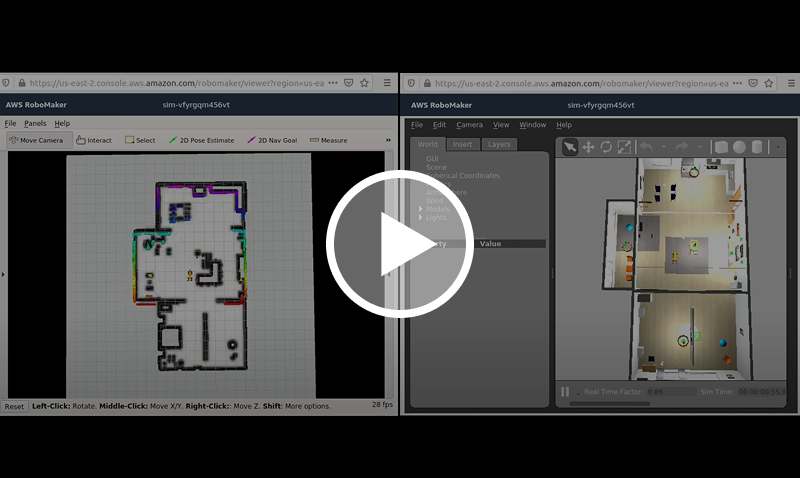
Behavior tests: coverage test
The next type of testing focuses on robot behavior. One of the most common tests for mobile robots is the coverage test (see Video 3), which measures how efficiently the robot covers the floor of an environment.
The test tracks the robot’s movement and generates a coverage grid, marking areas the robot has already covered. Using this map, along with parameters such as the robot's tool radius and coverage area offset, we can measure its progress and compare it to the coverage goal.
The test is marked as Failed if it times out before reaching the coverage goal. It’s marked as Passed if the coverage goal is achieved within the allotted time (less than the timeout).
Localization test
To make sure autonomous missions are reliable, the localization algorithm needs to stay accurate even with real-world disruptions. Therefore, developers should test the localization stack in dynamic environments. For instance, in Video 4, the robot navigates and localizes itself even when objects have been removed or shifted from their original spots.
This test checks if the localization tool can determine the robot's pose when some objects in the environment are deleted or moved to new spots. You can decide which objects should be moved or deleted and set their final positions when the Move option is turned on.
During the test, the robot moves through predefined or random points on the map until it either reaches all points or a timeout occurs.
The test is marked as Failed if a timeout occurs or all predefined points are reached, but the robot fails to localize itself within the desired tolerance. Conversely, it is marked as Passed if the robot successfully localizes itself with the required accuracy before the timeout or after reaching all points.
The test is marked as Failed if the robot cannot figure out its location accurately within the allowed time or after completing all required points. It’s marked as Passed if the robot successfully determines its location either before the time runs out or after reaching all the points.
You can find more tests in the ROS1 tests for AWS RoboMaker repository. These tests cover basic scenarios and significantly reduce the time-to-market for robotics projects. Efforts are currently underway to adapt these tests for a wider range of robots, including drones, robotic arms, and beyond.
Start a conversation with us